Motivation
The world is out of IPv4 addresses. While some can be bought and traded, ARIN is no longer issuing new assignments to organizations in the USA. My WISP, Black Mesa Wireless, came up against this problem last year when we asked ARIN for another block of IPv4 addresses and were told we were out of luck. While some ISPs NAT many customers through a few public IP addresses, there are many reasons not to do that and I refuse to. We assign each customer a public IP address. Now we will have to assign most of them IPv6 addresses only, and not IPv4.
It’s easy to get an allocation of IPv6 addresses, and there are so many that we should not run out for many times my lifetime, if ever. ARIN allocated us a /36 with very little difficulty or fanfare. The first thing we had to do was figure out how to split this up. After doing a bunch of reading about best practices, we came up with a sparse allocation scheme that should be OK should we grow to many times our current size. I will leave that for the reader to research, or maybe one day write a separate article.
All of that settled, we had to figure out how to provide good service to our customers even if they were running with only an IPv6 public address (or rather, subnet) on their WAN. T-Mobile has led the way on this, deploying 464XLAT on their network over the past few years. I have made use of this as a T-Mobile and then Project Fi customer, and it works just fine. While NAT64 is an option, it still breaks some applications and fails if IP literals (i.e. ip addresses written out rather than host names) are used in web sites or services. 464XLAT uses a scheme to NAT IPv6
traffic out IPv4 addresses and retains those mappings in a stateful way for the duration of a connection. This transparently works for pretty much everything.
Implementation
Deploying 464XLAT requires two special functions– client-side translation (CLAT) to translate client-side IPv4 traffic to encapsulated IPv6, and provider-side translation (PLAT), to translate from encapsulated IPv6 back to IPv4. At this time (December 2017) I am still not aware of any consumer routers that support CLAT out of the box. We would love it if our wireless CPE manufacturers (Ubiquiti and Mimosa) would support CLAT on their devices, or our preferred router manufacturer (Mikrotik) would support it on their devices, but none of them do yet. However, the OpenWRT and LEDE projects (which forked a while ago but are now merging back together) do support CLAT. Therefore, after some research, we found a few models of consumer routers that we could flash with LEDE, and deploy to customers. I will cover this in more detail shortly.
On the provider side, some routers such as Juniper routers do support PLAT, but we are already invested in Mikrotik, and they still do not. However, using the Jool project along with BIND9, it is possible to run PLAT on a Linux server with very minimal setup. We have a Proxmox VE HA cluster on which we run two PLAT nodes, which are set up to fail over using different OSPF costs, and additionally they will fail over to other machines in the cluster if one goes down. As these nodes are required for IPv6 customers to access the IPv4 internet, it is very important that they stay up. In the future we may consider moving to Juniper routers if Mikrotik doesn’t eventually address this need.
PLAT Implementation
Installing and configuring Jool and BIND9 is pretty easy. We are standardized on Ubuntu 16.04 LTS at the moment, so I will use that in my examples. Note that if you are doing this in a virtual machine (as we do), it needs to have full hardware virtualization, and not run in a container, as Jool is a kernel module.
Jool
Here are the instructions for installing the Jool kernel module. In this example we will use DKMS.
First, install dependencies:
root@plat-demo:~# apt -y install build-essential linux-headers-$(uname -r) dkms
... (output) ...
root@plat-demo:~# git clone https://github.com/NICMx/Jool.git
... (output) ...
root@plat-demo:~# dkms install Jool
... (output) ...
DKMS: install completed.
Now we must tell the machine to insert the jool module at boot with the correct settings. We are using the well-known prefix of
64:ff9b::/96
which is the default used by many CLAT devices on the IPv6 side. You will need to supply your own IPv4 subnet for translation. Here we use a documentation-reserved prefix. Open
/etc/rc.local
in your favorite editor and add the line:
/sbin/modprobe jool pool6=64:ff9b::/96 pool4=192.0.2.0/28
You will need to assign the pool4 addresses on the appropriate interface. We are doing this via OSPF so I will omit it for now. You could script it or add all the addresses on alias intefaces, we have it in our QUAGGA configuration. You will also need to make sure you are routing properly to the IPv6 prefix, which is beyond the scope of this writeup. Once all that is done, manually run the command you added to
/etc/rc.local
You should then be able to ping an IPv4 address through the PLAT device by pinging, for example,
64:ff9b::8.8.8.8
.
BIND9
This is even easier than Jool.
root@plat-demo:~# apt -y install bind9
Once that is done, use your favorite editor to open
/etc/bind/named.conf.options
and make sure it looks like this:
acl my_net {
        // Use your public prefixes here, these are documentation prefixes.
        2001:DB8::/32
        198.51.100.0/24;
        203.0.113.0/24;
        // You may want to include any RFC1918 subnets you use on your network
        10.0.0.0/8;
        192.168.0.0/16;
};

options {
        directory "/var/cache/bind";

        dnssec-validation auto;

        auth-nxdomain no;    # conform to RFC1035
        listen-on-v6 { any; };

        # This is the key. Note that you can write multiple of these if you need
        # more IPv6 prefixes.
        # "64:ff9b::/96" has to be the same as Jool's `pool6`.

        // use the well-known prefix
        dns64 64:ff9b::/96 {
                # Options per prefix (if you need them) here.
                # More info here: https://kb.isc.org/article/AA-01031
        };
        recursion yes;

        allow-recursion { my_net; };
};
Save it and restart with:
systemctl restart bind9
Assuming you have proper firewall and routing settings in place, you should now be able to get NAT64 by doing dns lookups to this server. For example, Slashdot still doesn’t have IPv6 deployed (shame on them). However, BIND9 will synthesize an IPv6 address for you:
root@plat-demo:~# dig AAAA @(dns-server-ip) slashdot.org

; <<>> DiG 9.10.3-P4-Ubuntu <<>> AAAA @(dns-server-ip) slashdot.org
; (1 server found)
;; global options: +cmd
;; Got answer:
;; ->>HEADER<<- opcode: QUERY, status: NOERROR, id: 49918
;; flags: qr rd ra; QUERY: 1, ANSWER: 1, AUTHORITY: 4, ADDITIONAL: 1

;; OPT PSEUDOSECTION:
; EDNS: version: 0, flags:; udp: 4096
;; QUESTION SECTION:
;slashdot.org.                  IN      AAAA

;; ANSWER SECTION:
slashdot.org.           292     IN      AAAA    64:ff9b::d822:b52d

;; AUTHORITY SECTION:
slashdot.org.           25241   IN      NS      ns2.dnsmadeeasy.com.
slashdot.org.           25241   IN      NS      ns1.dnsmadeeasy.com.
slashdot.org.           25241   IN      NS      ns3.dnsmadeeasy.com.
slashdot.org.           25241   IN      NS      ns4.dnsmadeeasy.com.

;; Query time: 33 msec
;; SERVER: #53()
;; WHEN: Sat Dec 23 09:52:52 MST 2017
;; MSG SIZE  rcvd: 156
As you can see, it has appended the well-known prefix. Now, we can ping this address from a host on the network with a route to the PLAT machine:
[brock@demo-client]-(~)-> ping6 64:ff9b::d822:b52d
PING 64:ff9b::d822:b52d(64:ff9b::d822:b52d) 56 data bytes
64 bytes from 64:ff9b::d822:b52d: icmp_seq=1 ttl=235 time=73.1 ms
64 bytes from 64:ff9b::d822:b52d: icmp_seq=2 ttl=235 time=72.9 ms
64 bytes from 64:ff9b::d822:b52d: icmp_seq=3 ttl=235 time=73.5 ms
64 bytes from 64:ff9b::d822:b52d: icmp_seq=4 ttl=235 time=73.4 ms

--- 64:ff9b::d822:b52d ping statistics ---
4 packets transmitted, 4 received, 0% packet loss, time 3004ms
rtt min/avg/max/mdev = 72.912/73.277/73.587/0.421 ms
That completes PLAT setup!
CLAT Implementation
This is a bit more tricky– we have to provide customers with a router that will do CLAT, so that their internal IPv4 devices will send out traffic via IPv6. OpenWRT/LEDE firmware will do this, but you have to find one of the many devices that will support these firmwares, make a firmware image, and then deploy it.
We are using some older linksys routers that are quite adequate for the plans most of our customers use, the EA3500, primarily. We use the LEDE image builder to make a custom image that has what we need in it. You can download that here:
LEDE Imagebuilder for Kirkwood.
Note that on this hardware you currently need to install the openwrt factory image first, then the LEDE sysupgrade image.
You can download that here:
So, flash the router from factory with the OpenWRT image. Then, on Linux extract the imagebuilder and change into that directory. Run the following command to build with 464xlat:
umask 022
make image PROFILE=linksys-audi PACKAGES="464xlat luci-ssl"
When it finishes you should have a file:
bin/targets/kirkwood/generic/lede-17.01.4-kirkwood-linksys-audi-squashfs-sysupgrade.tar
You need to upgrade the router with that:
scp bin/targets/kirkwood/generic/lede-17.01.4-kirkwood-linksys-audi-squashfs-sysupgrade.tar root@192.168.1.1:/tmp/sysupgrade.tar
ssh root@192.168.1.1 sysupgrade -n /tmp/sysupgrade.tar
When that completes, you should be able to access the router running LEDE at https://192.168.1.1.
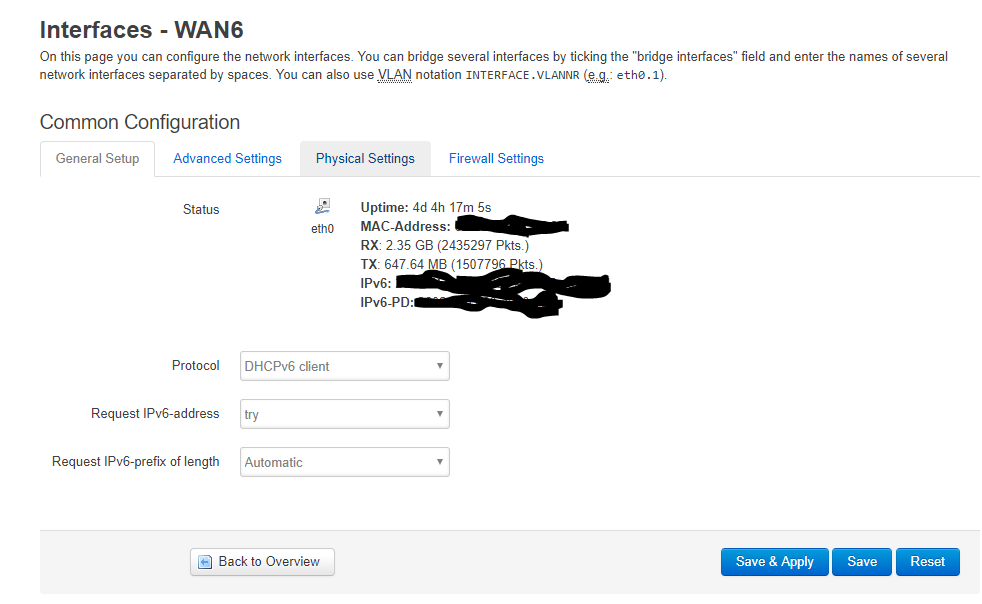
You need to log in (default is root, no password), go to network settings, and change the protocol for the IPv4 WAN to 464XLAT. In the IPv6 wan settings, change your DNS server to point to the IPv6 address of your PLAT device.
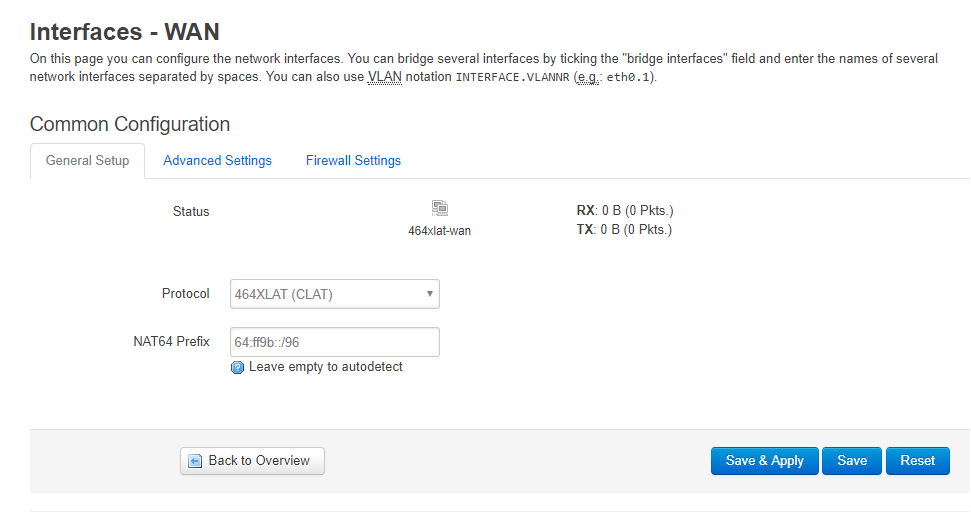

You should then be able to reboot the router, and 464XLAT should be working. Once you have a template router config just how you want it, you can extract the config files and give them as input to the image builder. This will give you a ready-to-go router firmware. We have done this plus additional scripting to set a wifi SSID and password, and print labels automatically.
Conclusion
I have seen very good throughput on this setup, basically limited by the client (CLAT) router’s wireless connection or CPU, the PLAT is pretty performant on VMs on some old Xeon servers. However, you need to make sure that the servers have ethernet offloading disabled as per this documentation. For me it made the difference between 0.5Mbps and 150Mbps throughput.
I highly recommend you test your setup with this IPv6 tester site.
I am happy to answer questions about this and also to take suggestions. Happy routing!